• Guest, Help The DPF Community Thrive - Join Our Donation Drive Today!

    We're launching a special DPF Donation Drive to ensure our beloved forum continues to flourish. Your support is vital in helping us cover essential server costs and keep our community running smoothly — This is more than just a donation; it's an investment in the future of our community.

    Join us in this crucial drive and let's ensure our forum remains a vibrant and dynamic place for everyone.

    Please visit the DPF Donation Drive Thread for details and instructions on how you can make your donation today!

Setting/ Lighting for pics of my pins?

Status
Not open for further replies.
Setting/ Lighting for pics of my pins?

kriscar

DPF Charter Member
DPF Charter Member
Rating - 100%
31   0   0
Messages
348
Location
KY
My pins are currently on black pages of my pin book.
What is best setting on my camera and best lighting situation for taking the pics?
Seems like the flash shows a glare on the pins in the middle.
I have a Canon PowerShot SD1400 IS.

Any advice would be greatly appreciated!

Have a magical day!!:wavey:
 
The flash will always get ya. I try to take mine in natural light but in most cases, good reflected light works well.
Another term is difussed light. Try to have the light directly over the pins so there will not be shadows.
 
Bright sunlight works best for me when I'm taking a photo of pins. But even better is to scan the pin instead of taking a photo of it, because then I get a very closeup and crisp image.
 
This is how we here at DPF take photos of our pins :p

40796517749320446139500.jpg


and the setup for our pinback banner photos :p
68882519927380596139500.jpg
 
I either take mine outside into direct sunlight or I put them in front of a nice window where the light is coming in the best. Set your camera to the close up type setting...possibly a flower on a lot of cameras and just watch your lighting while you turn the pins until you get them fairly even with the light. Hold the camera steady and snap away. :)
 
I just take pics with my snappy cannon :) form different angles and in different rooms bathroom has good light :) then look thru the images and use the best one :)
 
Seems like the flash shows a glare on the pins in the middle.

Try placing a piece of unlined white paper between the flash and the pin. For larger, hotshoe-mounted flashes, rotate the flash head so it bounces off a white posterboard, shower curtain, wall, or ceiling. The goal is to turn that small, hard light source into a giant, soft light source :)

Want to get crafty?

I recommend:

How To: DIY $10 Macro Photo Studio (via Strobist.com)

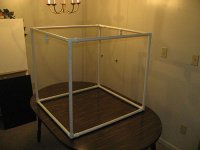
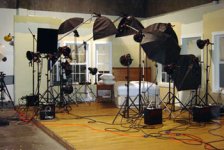
I have lots of umbrella and softbox lighting gear, but my goto gear for lighting small objects is a 3 foot DIY PVC cube under a white bedsheet.
 
I have lots of umbrella and softbox lighting gear, but my goto gear for lighting small objects is a 3 foot DIY PVC cube under a white bedsheet.
that's a great idea. i normally just bounce my strobes, use giant 60" umbrellas or use a piece of white paper as a pseudo-tent, but building a tent out of some PVC and bedsheets is an awesome idea!

i think im gonna head ot home depot right now! :D
 
Don't glue the pipes into the elbows! The cube and sheet can be re-arranged into a stand alone 3' x 6' shoot through panel * for portraits :) Makes it easier to tear down and pack too.

* If you buy two cheap T-fittings to connect pipes into two 6' lengths.
 
Last edited:
Don't glue the pipes into the elbows! The cube and sheet can be re-arranged into a stand alone 3' x 6' shoot through panel * for portraits :) Makes it easier to tear down and pack too.

* If you buy two cheap T-fittings to connect pipes into two 6' lengths.
:bigthumb:
 
I forgot to mention (going down a tangent here), when I went to WDW in 2009 I noticed most/all of the PhotoPass Photographers were using Nikon D70s cameras with flash brackets. That model is known for having extremely high flash sync speeds, which is used to make daylight look like darkness, but I'm not sure if that's the reason Disney seems to issue (?) them. Anyone know? The D70s will probably be the backup body I purchase next year.
 
I'm a bit of a novice when it comes to cameras. I bought a D40 last year and have been slowly learning how to use it. I love photography as an art form, but I don't spend as much time as I should be proficient behind the lens. I'm getting there though.

I've tried taking up-close pictures of some of my collectables with mixed results. Looking at the pics you took inside your light box really blew me away. Especially with a point-and-shoot camera! Very cool! I'm really interested in trying something like this with the D40. Any suggestions on settings?

As for the D70, I've actually never heard of that model. Is that a precursor of the D90?

Jesse
 
Last edited:
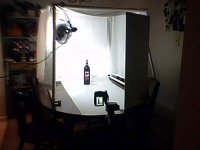
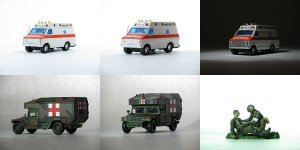
I'd start with the macro setting, designed for close-up shots. On many cameras, it is a flower icon. What I didn't show in the cube photo is I have a roll of white paper hanging on the upper back pipe. That's where the speckled grey look comes from in a couple of the photos. (There is a light behind the paper.)

It really is all about the lighting. The clamp lamp in the photo is < $5 at Lowe's. I put a coiled CFL bulb in it so the light wouldn't get firestarter hot. The spotlight effect at top right was accomplished by slipping a Pringles tube with the end cut out over the bulb. (If no Pringles at home, can also use a paper towel roll or rolled up cereal box with ends cut out.) Clamp lamps were easier for me to start with because, unlike flash, the lamps are always on and can be moved around to see different lighting effects. PVC pipe is super cheap too :)

In the photo, the lamp is clamped to the inside, but it also works to clamp outside and shine the light through a sheet. IMO, that's even better for shiny objects like pins.

I linked to the D70s. It was out before the D90, but I haven't used one. I read lots of good reviews on it though.
 
Last edited:
Status
Not open for further replies.
Back
Top