

How to: PODM Lighted Display
abrown1087
New DPF Member
- Messages
- 561
- Location
- Maryland GO TERPS!
Ok so I'm sure there is a better place for this thread, but I figured I'd start here first. Mods please feel free to re-locate! Also this could possibly be sticky-ed since I know a lot of people are curious about this?
Any way here are materials, steps, and pictures of how to make a lighted shadow box for your PODM collection!
Good Luck with you PODM display creations 😀 😀 😀
**disclaimer: I can't say for sure that leaving lights on for a super long period of time wont do anything to the film cels. However, from reading I have done today LED lights seem to be the way to go as far a regular animation cels go. And the LED xmas lights i used are not high watt bulbs and are just battery powered indoor use only and pretty small compared to traditional xmas light bulbs. They also aren't 100%clear bulbs they have kind of like a frost to the bulbs. I left them on for a bit outside of the shadow box and they really didn't seem to generate heat. Also mine are not right up against the film cels and have paper between them and the cels. high watt regular light bulbs(I have seen a few lamp displays) or flashlights are what you want to stay away from as well as too much exposure to direct sun light. These are the kinds of things that will melt or damage you PODM cels. I am not saying I'm 100% right, and this how to is just explaining what I used and how it turned out to give people a starting point for their PODM displays. Thanks!**
Materials:
-shadow box(I used a 9x21in just for something different, but any will work just make sure it is big enough for 12)
-black foam board
-exacto knife
-white chalk(for marking off measurements on the foam board)
-1 sheet of white computer paper
-2 strings of 15 battery powered white LED lights(if you can find a string longer than 15 go with that lol)
-tape
*all of this can be found at craft stores like michael's or ac moore. The lights I had to get at hobby lobby*
Steps:
1. Get all of you supplies!
2. Measure, mark off with chalk, and cut your foam board to fit inside your shadow box frame.
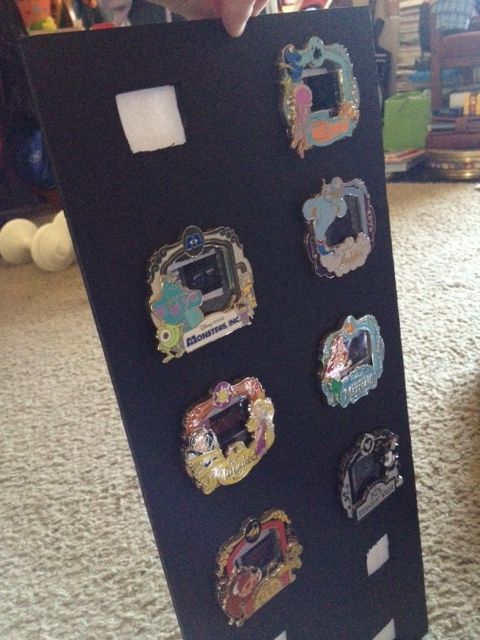
3. Decide how you want to place each pin and mark it off.
4. You can then stick the pins through the foam board where you marked off and then take them out so you have pin holes.
5. Then mark off squares on the foam board where the scene of the pin will be.
6. Cut out your squares carefully with the exacto knife.
7. Cut out pieces of white computer paper to tape over the squares on your foam board. This is to make the scene brighter and to avoid just seeing the bulbs though the scene.
8. Stick your pins onto the foam board and put the pin backs on.
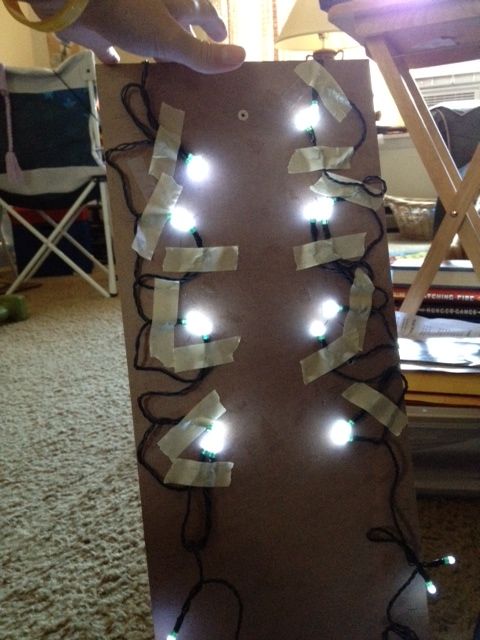
9. Now take out the very back of your shadow box(The piece with the hanging hardware on the back).
10. Tape your lights down on the side that goes inside the shadow box. This will take some trial and error/marking things up with a pencil to get the lights in the right spots(I put 2 bulbs behind each scene except for my Aladdin which has 3 since it is a darker scene.
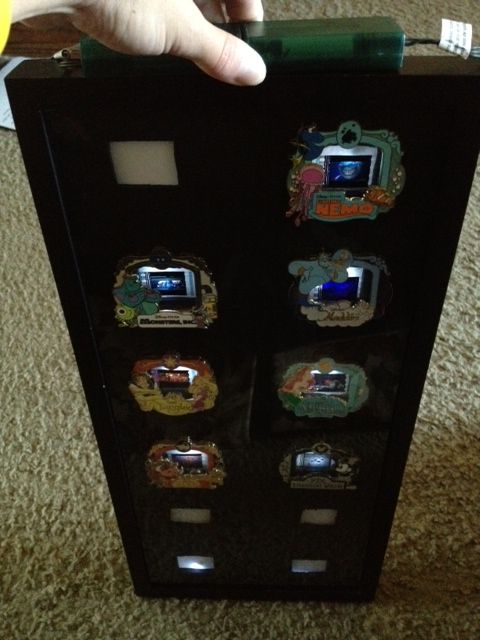
11. Now put your foam board into the shadow box followed by the back with your lights.
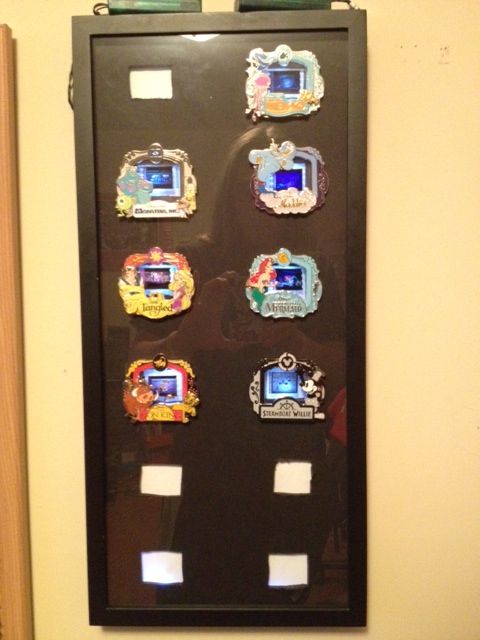
12. Hang it up and you are finished!
Pictures:

On the wall finished product 😀
Any way here are materials, steps, and pictures of how to make a lighted shadow box for your PODM collection!
Good Luck with you PODM display creations 😀 😀 😀
**disclaimer: I can't say for sure that leaving lights on for a super long period of time wont do anything to the film cels. However, from reading I have done today LED lights seem to be the way to go as far a regular animation cels go. And the LED xmas lights i used are not high watt bulbs and are just battery powered indoor use only and pretty small compared to traditional xmas light bulbs. They also aren't 100%clear bulbs they have kind of like a frost to the bulbs. I left them on for a bit outside of the shadow box and they really didn't seem to generate heat. Also mine are not right up against the film cels and have paper between them and the cels. high watt regular light bulbs(I have seen a few lamp displays) or flashlights are what you want to stay away from as well as too much exposure to direct sun light. These are the kinds of things that will melt or damage you PODM cels. I am not saying I'm 100% right, and this how to is just explaining what I used and how it turned out to give people a starting point for their PODM displays. Thanks!**
Materials:
-shadow box(I used a 9x21in just for something different, but any will work just make sure it is big enough for 12)
-black foam board
-exacto knife
-white chalk(for marking off measurements on the foam board)
-1 sheet of white computer paper
-2 strings of 15 battery powered white LED lights(if you can find a string longer than 15 go with that lol)
-tape
*all of this can be found at craft stores like michael's or ac moore. The lights I had to get at hobby lobby*
Steps:
1. Get all of you supplies!
2. Measure, mark off with chalk, and cut your foam board to fit inside your shadow box frame.
3. Decide how you want to place each pin and mark it off.
4. You can then stick the pins through the foam board where you marked off and then take them out so you have pin holes.
5. Then mark off squares on the foam board where the scene of the pin will be.
6. Cut out your squares carefully with the exacto knife.
7. Cut out pieces of white computer paper to tape over the squares on your foam board. This is to make the scene brighter and to avoid just seeing the bulbs though the scene.
8. Stick your pins onto the foam board and put the pin backs on.
9. Now take out the very back of your shadow box(The piece with the hanging hardware on the back).
10. Tape your lights down on the side that goes inside the shadow box. This will take some trial and error/marking things up with a pencil to get the lights in the right spots(I put 2 bulbs behind each scene except for my Aladdin which has 3 since it is a darker scene.
11. Now put your foam board into the shadow box followed by the back with your lights.
12. Hang it up and you are finished!
Pictures:
On the wall finished product 😀
Last edited: